
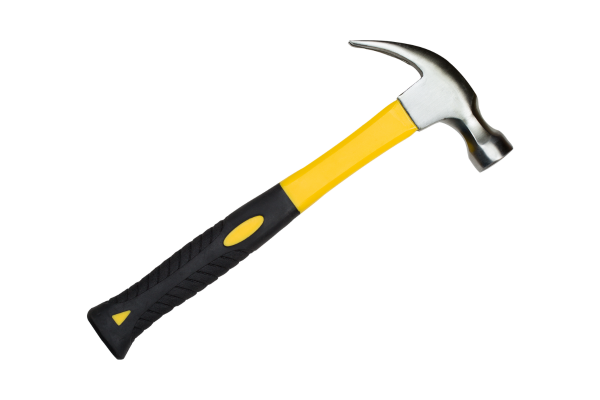
A hammer is one of the simplest tools in a household toolbox, but it is also one of the tools that deserves careful inspection. A hammer can remain useful for many years when the head, handle, striking surface, and storage conditions are properly maintained.
Unlike a screwdriver or wrench, a hammer is designed to deliver repeated impact. That means deterioration in the handle or head can have consequences beyond reduced appearance. A loose head, cracked handle, damaged striking surface, or severe corrosion can affect how the tool behaves and may create an avoidable safety problem.
Fortunately, most routine hammer maintenance is straightforward. The key is knowing what to inspect, cleaning the tool without damaging its surfaces, keeping moisture under control, and recognizing when maintenance is no longer enough.
This guide focuses on ordinary household and workshop hammers. Specialty hammers may have different maintenance requirements, so the manufacturer’s instructions should take priority whenever they are available.
Understanding the Main Parts of a Hammer
Before maintaining a hammer, it helps to understand which parts deserve attention.
A traditional hammer generally consists of a head and a handle.
The head may include:
- A striking face
- A claw
- A neck
- An eye through which the handle passes
The handle may be made from:
- Wood
- Fiberglass
- Composite material
- Other engineered materials
Different hammer designs have different construction methods.
A claw hammer used for household repairs has different requirements from a ball-peen hammer, mallet, framing hammer, or specialty striking tool.
Despite those differences, the basic maintenance principles remain similar:
Keep the tool clean.
Inspect it for damage.
Protect it from corrosion.
Keep the handle sound.
Do not continue using a structurally compromised hammer.
Why Hammer Maintenance Matters
A hammer is subjected to repeated impact, so its condition can change gradually.
The striking face may develop dents, mushrooming, or other deformation.
The handle can become cracked, worn, or loose.
The head may develop corrosion.
The connection between the head and handle can deteriorate.
Dirt and grease can also reduce grip and make damage more difficult to notice.
Regular inspection helps identify these problems while they are still relatively small.
The goal of maintenance is not to make the hammer look new. It is to keep the tool in a condition appropriate for its intended use.
Start With a Visual Inspection
Before cleaning the hammer, examine the entire tool.
Look at the head from several angles.
Inspect:
- Striking face
- Claw
- Neck
- Edges
- Eye area
- Handle connection
- Handle surface
Look for:
- Cracks
- Deep corrosion
- Deformation
- Loose components
- Chips
- Excessive wear
- Splitting
- Unusual movement
Do not strike the hammer against another object simply to test it.
A visual inspection and normal handling provide useful information without deliberately creating additional impact.
If you see serious structural damage, remove the hammer from service until its condition can be properly assessed.
Check Whether the Head Is Secure
The connection between the hammer head and handle is one of the most important areas to inspect.
A traditional wooden-handled hammer may use a handle fitted through the eye and secured using appropriate wedges or another design-specific method.
Composite and fiberglass handles use different construction methods.
Regardless of the design, the head should remain securely attached.
Hold the hammer normally and look for signs of movement.
If the head visibly shifts relative to the handle, do not continue using it simply because the movement seems minor.
A loose head can become progressively less secure.
Do not improvise a repair unless you understand the hammer’s construction and the manufacturer supports the procedure.
Inspect the Striking Face
The striking face receives repeated impact and therefore deserves frequent inspection.
Look for:
- Deep dents
- Chips
- Cracks
- Excessive mushrooming
- Severe deformation
- Significant corrosion
Minor marks from normal use are not necessarily a problem.
However, severe deformation can change the way the hammer contacts the object being struck.
If the striking surface has developed serious defects, stop and evaluate whether the hammer should be professionally serviced or replaced.
Do not assume that grinding the face flat is automatically an appropriate repair. Removing material can change the intended geometry or heat treatment of the working surface.
Inspect the Claw
On a claw hammer, inspect the claw separately from the striking face.
Look for:
- Cracks
- Excessive bending
- Severe wear
- Corrosion
- Damaged edges
The claw is designed for specific tasks such as pulling suitable fasteners and should not be treated as a general-purpose pry bar unless the hammer is specifically designed for that type of work.
Using the claw for tasks beyond its design can deform the tool.
Clean the claw thoroughly enough that its condition is visible.
Clean Dirt Before Applying Chemicals
A hammer exposed to normal household work may collect dust, sawdust, grease, paint, soil, or other contamination.
Start with dry cleaning.
Use a cloth or soft brush to remove loose debris.
Pay attention to:
- Around the head
- Claw openings
- Handle texture
- Head-to-handle connection
- Recesses
Removing loose contamination first makes it easier to identify actual corrosion or damage.
It also reduces the amount of cleaning product necessary later.
Cleaning a Metal Hammer Head
For ordinary dirt on a compatible metal surface, mild soap and water may be appropriate.
Dampen a cloth rather than soaking the entire tool.
Wipe the head carefully.
Use a soft brush for grooves or difficult areas.
Then remove remaining residue and dry the head completely.
Avoid unnecessary immersion, particularly when the hammer has a wooden handle.
Excess water can enter the wood and make drying more difficult.
Cleaning a Wooden Handle
Wooden handles require different treatment from metal heads.
Do not soak them.
For routine cleaning, use a lightly damp cloth and then dry the handle thoroughly.
Inspect the wood after cleaning.
Look for:
- Cracks
- Splits
- Swelling
- Deep dents
- Loose fibers
- Areas around the head
A wooden handle can deteriorate from repeated impacts, environmental changes, moisture, chemicals, or age.
Cleaning cannot repair structural cracks or splitting.
If the handle appears compromised, do not continue using the hammer simply because the head remains in good condition.
Cleaning Fiberglass and Composite Handles
Modern hammers may use fiberglass or composite handles because these materials behave differently from wood.
Clean the surface according to the manufacturer’s recommendations.
Mild soap and water may be appropriate for some handles.
Avoid strong solvents unless compatibility is confirmed.
Inspect the handle for:
- Cracks
- Cuts
- Impact damage
- Delamination
- Unusual bulges
- Separation from the head
A fiberglass handle should not automatically be considered indestructible.
Visible structural damage deserves attention regardless of material.
Remove Grease From the Handle
A greasy hammer handle can reduce grip.
If the handle becomes contaminated with oil or grease, clean it using a method compatible with the material.
For many handles, mild detergent and water are a reasonable starting point.
Avoid allowing a strong degreaser to remain on a rubberized or composite grip unless the manufacturer confirms compatibility.
After cleaning, dry the handle thoroughly.
The finished grip should be clean enough to handle securely.
How to Remove Paint From a Hammer
Hammer heads and handles can become covered with paint during home renovation.
Fresh paint is easier to manage than cured paint.
Remove fresh contamination promptly when practical.
For dried paint, start with a relatively gentle mechanical method appropriate to the surface.
A plastic scraper can be useful for some deposits.
Avoid aggressive metal scraping on finished surfaces.
If a chemical paint remover is necessary, check compatibility with the metal, coatings, handle material, and any markings.
The goal is to remove unwanted paint without stripping the original protection or damaging the handle.
How to Deal With Rust on the Head
Hammer heads are often made from steel and may develop surface corrosion.
Light surface rust can usually be treated using an appropriate rust-removal method.
Start by cleaning away grease and dirt.
Then inspect the corrosion.
Ask whether it is:
Surface discoloration
Rough surface rust
Moderate pitting
Deep corrosion
The more metal has been lost, the more important the condition becomes.
Removing surface rust does not restore metal that has already disappeared.
Avoid Aggressive Grinding
A heavily rusty hammer may tempt you to use a grinder or wire wheel immediately.
That can remove corrosion quickly, but it can also remove sound metal and change the surface.
The striking face deserves particular caution.
Its shape and material properties are related to how the hammer performs under impact.
Do not grind a striking surface simply to make it shiny.
For serious corrosion or deformation, professional assessment or replacement may be safer than aggressive home restoration.
Inspect for Mushrooming
Mushrooming refers to deformation of a striking surface or other metal area in which material spreads outward from repeated impact.
This can occur on certain striking tools after extensive use.
The condition deserves attention because altered metal may create irregular edges or other defects.
Do not assume that every hammer with a slightly worn face needs to be ground flat.
If mushrooming becomes substantial, follow appropriate tool-specific maintenance guidance or consider professional evaluation.
The correct repair depends on the hammer design and material.
Do Not Use a Standard Hammer as a Substitute for Other Tools
Many hammer problems originate from misuse rather than insufficient maintenance.
Avoid using a standard household hammer as:
- A pry bar
- A chisel
- A punch
- A wrench
- A heavy-duty demolition tool
unless the hammer is specifically designed for the task.
The claw can provide some leverage in its intended applications, but excessive prying can bend it.
The striking face should also be used with appropriate materials and force.
Using the right tool for the job is one of the most effective forms of maintenance because it prevents damage before it occurs.
Keep the Striking Face Appropriate for Its Intended Use
Some hammers use specialized faces for specific materials.
A soft-faced hammer, for example, should not be maintained as though it were a conventional steel-faced hammer.
Different face materials can have very different cleaning and replacement requirements.
Before using a cleaning product, inspect the manufacturer’s specifications.
Do not assume that sanding, polishing, or chemical treatment appropriate for bare steel is appropriate for every hammer face.
Lubrication Usually Has a Limited Role
Most traditional fixed-head hammers do not require routine lubrication.
The head and handle are not conventional moving mechanisms.
Adding oil to the head usually provides little benefit and can attract dirt.
There may be specialized hammer designs with moving or adjustable components, but those should follow their manufacturer’s instructions.
For an ordinary claw hammer, rust prevention is generally more important than lubrication.
Protect the Metal From Corrosion
If the hammer has exposed steel and is stored in a humid environment, suitable corrosion protection may be appropriate.
The exact product depends on the tool’s finish and storage conditions.
A thin protective film may be useful on compatible bare metal.
Avoid excessive oil because it can transfer to the handle and attract dust.
For long-term storage, a suitable storage coating or corrosion inhibitor may be more appropriate.
Always follow product instructions.
Store the Hammer Correctly
Storage conditions affect the hammer’s lifespan.
Keep it:
- Dry
- Clean
- Protected from unnecessary impact
- Away from persistent moisture
- Easy to inspect
Do not leave a hammer on a damp garage floor.
Avoid storing it alongside wet rags or other moisture sources.
If multiple heavy tools are thrown into the same box, the hammer head can strike other equipment and cause unnecessary damage.
A dedicated compartment, rack, or appropriate shelf can reduce these impacts.
How to Store a Wooden-Handled Hammer
For wooden-handled tools, avoid prolonged exposure to excessive moisture.
Do not store the hammer in a location where water routinely accumulates.
Inspect the handle periodically for changes.
If the storage environment is very dry or very humid, environmental conditions may affect the wood over time.
The goal is a stable, reasonably dry storage environment rather than extreme conditions.
How to Store a Fiberglass-Handled Hammer
Fiberglass handles are generally more resistant to some environmental conditions than wood, but they still require inspection.
Keep the handle clean and dry.
Avoid exposing it unnecessarily to chemicals.
Store the hammer so the head and handle are not subjected to repeated impacts from other heavy tools.
Check the handle periodically for visible damage.
Protect the Toolbox From the Hammer
Maintenance works in both directions.
A hammer can also damage other tools if it is thrown into a crowded drawer.
The heavy steel head can strike:
- Screwdriver tips
- Measuring tools
- Pliers
- Finished surfaces
- Other handles
Store heavy striking tools separately when practical.
This keeps the hammer protected while also protecting the rest of the toolbox.
A Five-Minute Hammer Inspection
A quick inspection can cover the most important areas.
Step 1
Look at the head for cracks, excessive corrosion, or deformation.
Step 2
Inspect the striking face.
Step 3
Check the claw if present.
Step 4
Inspect the handle for cracks, splitting, or damage.
Step 5
Check that the head remains securely attached.
Step 6
Wipe away dirt and moisture.
Step 7
Return the hammer to dry, organized storage.
This simple routine can catch many problems early.
What to Do After Using a Hammer Outdoors
Outdoor work can expose the hammer to:
- Rain
- Soil
- Mud
- Plant material
- Dust
- Humidity
Clean off significant contamination before storage.
Dry the hammer completely.
Inspect the metal head for early corrosion.
Pay attention to the handle if it is made from wood.
Do not assume that a hammer can simply be placed back in a closed toolbox while wet.
Moisture trapped inside storage can affect both the hammer and nearby tools.
How to Clean a Hammer Used in Construction Work
Construction environments can produce more demanding contamination.
Concrete dust, drywall dust, adhesives, paint, soil, and other debris can accumulate on the tool.
Remove dry dust before introducing water.
Deal with adhesives, paint, or hardened material separately using methods compatible with the tool.
Do not attack every contaminant with a wire brush or grinder.
The goal is to remove contamination while preserving the original tool.
When a Hammer Should Be Professionally Assessed
Most ordinary cleaning does not require professional service.
However, professional evaluation may be appropriate when:
- The head is cracked
- The head is loose
- The striking face is seriously damaged
- The handle has structural damage
- The claw is significantly deformed
- Corrosion has removed substantial material
- The tool is specialized or expensive
A professional may be able to determine whether a tool can be safely repaired.
When the condition is uncertain and the tool will be used for significant force, safety should take priority over restoration.
When Replacement Is the Better Choice
Some hammer problems are not worth repairing.
Replacement may be appropriate when:
- The handle has serious structural cracks
- The head can no longer be securely attached
- Severe corrosion has compromised the metal
- The striking surface is badly damaged
- The claw has significant deformation
- The tool has suffered substantial impact damage
A hammer is relatively inexpensive compared with the consequences of relying on a compromised striking tool.
Do not keep using a damaged hammer simply because it has sentimental or cosmetic value unless it can be safely restored.
Common Hammer Maintenance Mistakes
Soaking wooden handles
Excess water can affect the wood and make drying difficult.
Oiling the entire hammer
Oil generally provides little benefit on a fixed hammer and can make the handle or head unnecessarily dirty.
Grinding the striking face without understanding the design
Aggressive material removal can change the tool.
Ignoring a loose head
A loose head is a serious maintenance warning.
Using the claw as a universal pry bar
Excessive leverage can deform it.
Using a hammer to strike other hardened tools
Not every striking surface is intended for contact with every material.
Storing the hammer while wet
Moisture can accelerate corrosion and affect nearby tools.
Treating visible rust as only cosmetic
Corrosion severity should be evaluated rather than judged entirely by appearance.
A Practical Hammer Maintenance Routine
For ordinary household use, a simple routine is enough.
After use: remove dirt and moisture.
During inspection: check the head, striking face, claw, handle, and connection.
After wet exposure: dry the tool completely.
During toolbox maintenance: inspect for corrosion and handle damage.
Before long-term storage: clean, dry, inspect, and protect exposed metal when appropriate.
When structural damage appears: stop using the hammer until it has been evaluated.
This routine requires little time but can prevent small maintenance problems from becoming safety problems.
Final Thoughts
Caring for a hammer is less about polishing the metal and more about preserving the tool’s structural condition.
The most important areas are the connection between the head and handle, the condition of the striking face, the integrity of the handle, and the absence of significant corrosion or deformation.
Keep the tool clean and dry, remove contamination before it becomes difficult to manage, and store the hammer in a way that protects both the hammer and the other tools around it.
Wooden handles deserve special attention because they should not be soaked, while fiberglass and composite handles should be protected from inappropriate chemicals and inspected for structural damage.
Avoid excessive grinding, unnecessary oiling, and misuse. A hammer designed for household work should not routinely be used as a substitute for a pry bar, chisel, or other specialized tool.
Most importantly, recognize the difference between normal wear and a compromised tool.
A few scratches or small cosmetic marks usually do not matter.
A cracked handle, loose head, badly damaged striking face, severely corroded component, or significantly deformed claw deserves much more attention.
The best hammer-maintenance routine is therefore simple: inspect it regularly, keep it clean and dry, use it for its intended purpose, store it properly, and remove it from service when its structural condition becomes questionable.
That approach keeps the tool useful without turning routine maintenance into unnecessary restoration.
Related Guides
- How to Maintain Screwdrivers So They Last Longer
- How to Maintain Pliers and Keep Their Joints Moving Smoothly
- How to Maintain an Adjustable Wrench
- How to Clean Hand Tools After Heavy Use Without Damaging the Finish
- How to Tell Whether a Dirty Tool Needs Cleaning, Lubrication, or Replacement
FAQ
How often should I inspect a hammer?
There is no universal schedule. Inspect it after demanding or unusual use, after exposure to moisture, during routine toolbox maintenance, and whenever the tool feels or looks different.
How do I know if a hammer head is loose?
Look for visible movement between the head and handle and any unusual gap or instability. Do not continue using a hammer if you suspect the head is not securely attached.
Can I wash a hammer with water?
The metal head of many ordinary hammers can be cleaned with a controlled amount of water and mild detergent when compatible with the finish. Avoid soaking wooden handles and dry the entire tool thoroughly afterward.
Should I oil a hammer?
Most ordinary fixed-head hammers do not need routine lubrication. A suitable corrosion-protection product may be appropriate for exposed metal in humid storage environments, but excessive oil can attract dirt.
Can I grind the striking face of a hammer?
Aggressive grinding can remove material and change the geometry or characteristics of the striking surface. Do not grind it simply to improve its appearance; follow tool-specific maintenance guidance when repair is necessary.
How should I care for a wooden hammer handle?
Keep it clean and avoid soaking it. Inspect it for cracks, splitting, swelling, or looseness around the head. Dry it thoroughly after exposure to moisture.
Why is my hammer head developing rust?
Possible causes include humidity, condensation, wet storage, damaged protective finishes, and prolonged exposure to contaminants. Clean the corrosion appropriately and investigate the storage environment.
Can a rusty hammer still be used?
Light surface rust does not automatically make a hammer unusable. Assess the severity of the corrosion and look for pitting, material loss, cracks, and deformation before returning the tool to service.
When should I replace a hammer?
Replacement should be considered when the head is cracked or cannot remain securely attached, the handle has serious structural damage, the striking surface is severely compromised, or corrosion has caused significant material loss.
Can I use my hammer as a pry bar?
A standard hammer should not automatically be used as a pry bar. Excessive leverage can deform the claw or other parts. Use a tool designed for the specific job whenever possible.
