
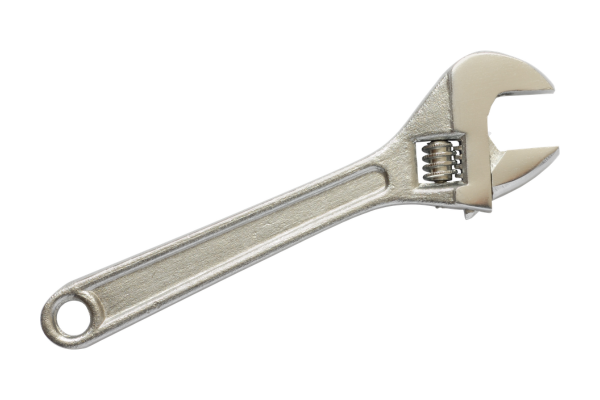
An adjustable wrench is one of the most useful tools in a household toolbox because a single tool can accommodate a range of fastener sizes. Unlike a fixed-size wrench, however, an adjustable wrench contains a moving jaw and a threaded adjustment mechanism that require a little more attention.
Dirt, grease, metal particles, paint, and corrosion can accumulate around the adjustment screw and exposed threads. When that happens, the jaw may become difficult to move, the mechanism may develop excessive resistance, or the wrench may feel loose during use.
These symptoms do not always mean the tool is worn out. In many cases, proper cleaning and inspection can restore normal movement. At the same time, lubrication should not be used as a substitute for cleaning, and a wrench with significant jaw or thread damage may need to be replaced.
Maintaining an adjustable wrench is therefore mainly about keeping the mechanism clean, protecting the metal from corrosion, checking the condition of the jaws, and making sure the moving jaw remains secure.
This guide explains how to maintain an adjustable wrench safely and effectively while avoiding common practices that can shorten its useful life.
Understanding How an Adjustable Wrench Works
Before maintaining the tool, it helps to understand the basic parts.
A typical adjustable wrench has a fixed jaw and a moving jaw. The moving jaw travels along a threaded adjustment mechanism controlled by a worm screw or similar mechanism.
When you turn the adjustment screw, the moving jaw opens or closes.
This design gives the wrench its versatility, but it also creates areas where contamination can accumulate.
The most important areas to inspect are:
- Fixed jaw
- Moving jaw
- Adjustment screw
- Exposed threads
- Sliding surfaces
- Jaw faces
- Handle
- Corrosion-prone edges
A problem in one of these areas can affect how the entire wrench feels during use.
For example, dirt in the adjustment mechanism can make the jaw difficult to move. Damage to the jaws can cause poor contact with the fastener. Corrosion on the threads can create rough movement.
Understanding these relationships makes maintenance much easier.
Start With a Visual Inspection
Always begin by looking at the wrench before applying a cleaner or lubricant.
Inspect the full tool under good lighting.
Look for:
- Rust
- Grease buildup
- Paint residue
- Dirt
- Damaged threads
- Jaw wear
- Cracks
- Bends
- Excessive gaps
- Damaged adjustment components
Move the adjustment mechanism gently.
Do not force it.
Pay attention to whether the moving jaw travels smoothly across its range or becomes tight at a particular point.
A mechanism that is consistently stiff may simply be dirty.
A mechanism that suddenly catches at one specific point may have damaged or corroded threads.
This distinction becomes important later.
Check the Jaws Before Cleaning
The jaws are the working surfaces of the wrench.
Look at both the fixed and moving jaws.
Check whether their contact surfaces are:
- Clean
- Straight
- Free from excessive wear
- Free from deep corrosion
- Properly aligned
The jaws should remain capable of engaging the intended fastener securely.
If the working surfaces are heavily rounded, chipped, distorted, or otherwise damaged, cleaning alone will not restore the original shape.
Do not try to improve a badly worn wrench simply by removing more metal.
The geometry of the jaws is part of the tool’s function.
Remove Loose Dirt First
If the wrench is visibly dirty, begin with dry cleaning.
Use a soft brush or dry cloth to remove loose dust, soil, metal particles, and other debris.
Pay particular attention to the adjustment area.
Brush around the exposed threads and the region where the moving jaw travels.
This first step is useful because loose contamination can become much more difficult to remove after it mixes with water or cleaning products.
It also provides a clearer view of the actual condition of the mechanism.
Clean the Adjustment Mechanism
The adjustment mechanism is the area most likely to benefit from careful cleaning.
Start by brushing away loose debris.
Then use a mild cleaning solution if necessary and compatible with the tool’s finish.
Apply the cleaner in a controlled way rather than flooding the wrench.
Move the jaw gradually through its normal range so that accessible sections of the mechanism can be reached.
Do not force a stuck jaw.
The purpose of moving the jaw during cleaning is to expose different areas, not to overpower contamination through mechanical force.
If the mechanism remains tight, stop and reassess rather than continuing to turn the adjustment screw aggressively.
Why Dirty Threads Can Make the Wrench Feel Broken
Fine debris mixed with grease can accumulate in the threads.
When that happens, turning the adjustment screw may feel rough or unusually heavy.
This can lead to the mistaken belief that the mechanism is permanently damaged.
Cleaning may reveal that the underlying threads are still in good condition.
This is one reason proper maintenance is often preferable to immediately replacing the tool.
At the same time, not every stiff mechanism is caused by dirt.
Corrosion, thread damage, deformation, and wear can produce similar symptoms.
The inspection after cleaning is therefore critical.
Use a Soft Brush on the Threads
A toothbrush or soft nylon brush can be useful for cleaning exposed threads.
Work in the direction of the thread where practical.
Avoid using a sharp metal object to scrape deeply into the grooves.
A steel pick can scratch the surface or deform a small part of the thread.
The objective is to loosen contamination without changing the shape of the mechanism.
For stubborn deposits, use a compatible cleaner and allow it to work according to its instructions before brushing again.
Cleaning a Chrome-Plated Adjustable Wrench
Many adjustable wrenches have a chrome-plated finish.
Chrome can provide corrosion resistance and a polished appearance, but it should not be treated as indestructible.
Avoid aggressive abrasives that could scratch or damage the plating.
Start with:
- Mild detergent
- Soft cloth
- Soft nylon brush
- Controlled cleaning
For stubborn residue, verify that any degreaser or solvent is compatible with the finish before applying it.
A small test on an inconspicuous area can help prevent damage to the entire tool.
Preserving the original finish is generally preferable to creating a larger restoration problem while trying to remove a minor stain.
Removing Grease From an Adjustable Wrench
Grease often accumulates around the adjustment mechanism.
Begin by wiping away as much of the heavy residue as possible with a dry cloth.
Then use a suitable degreasing method.
A mild detergent can handle some contamination.
A dedicated degreaser may be necessary for heavier buildup.
Whatever product you use, make sure it is suitable for the tool’s materials and finish.
Apply only as much as necessary.
After removing the grease, wipe away the remaining residue and dry the wrench completely.
Do not assume that the mechanism needs to be heavily lubricated simply because the old grease is gone.
The appropriate lubrication should be determined after cleaning.
How to Remove Paint From the Adjustment Mechanism
Adjustable wrenches are often used during home renovation projects, making paint contamination relatively common.
Fresh paint should be removed as soon as practical.
For dried paint, choose a method appropriate for the paint and tool finish.
A plastic scraper can sometimes remove loose material while reducing the chance of scratching the metal.
Avoid forcing a metal blade into the threads.
If paint has hardened deep inside the adjustment mechanism, a compatible chemical treatment may be necessary, but it should be tested first.
Do not use an aggressive solvent simply because it removes paint quickly.
The mechanism still needs to retain its original geometry.
Check the Moving Jaw After Cleaning
Once the mechanism has been cleaned, move the jaw slowly through its range.
It should travel consistently without severe resistance or sudden binding.
Look at the gap between the moving and fixed jaws.
The exact amount of movement and alignment will depend on the wrench design, but the important point is that the moving jaw should remain controlled.
If it moves excessively from side to side, investigate further.
Excessive play may indicate wear in the adjustment mechanism.
A wrench that looks clean but has significant mechanical looseness should not be considered fully maintained.
Inspect the Worm Screw
The worm screw is a critical part of the adjustment system.
Inspect the visible portion for:
- Damaged teeth
- Heavy corrosion
- Embedded debris
- Deformation
- Unusual wear
Turn the adjustment mechanism slowly while observing the screw.
If the screw has visible damage, do not assume that lubrication will restore it.
The mechanism may need repair or replacement depending on the design.
Do not force the adjustment screw through a damaged section.
That can increase the damage and make later repair more difficult.
Should You Lubricate an Adjustable Wrench?
The answer depends on the design and manufacturer’s recommendations.
Some adjustable wrenches benefit from a small amount of lubricant on the adjustment mechanism.
Others may require relatively little.
The most important thing is to lubricate after cleaning, not simply add oil to existing contamination.
Use a suitable lubricant in a small amount.
Apply it to the appropriate mechanism rather than coating the entire wrench.
Then move the jaw through its normal range to distribute the lubricant.
Finally, wipe away excess.
The objective is smooth operation without creating a thick layer that attracts dust.
Do Not Over-Lubricate the Threads
More lubricant is not always better.
An excessively oily adjustment mechanism can collect:
- Dust
- Sand
- Metal particles
- Wood fibers
- Grease
- Workshop debris
The contamination can eventually create the same stiffness that the lubricant was meant to solve.
A thin, appropriate application is generally easier to maintain.
If the outside of the wrench becomes visibly oily after lubrication, remove the excess with a clean cloth.
Oil Versus Grease for the Adjustment Mechanism
Different products can have different characteristics.
A light lubricant may make sense for a mechanism that is frequently adjusted.
A grease may provide longer-lasting lubrication in certain designs, but it can also hold more dust and may not be appropriate for every wrench.
The correct choice should follow the manufacturer’s recommendation whenever available.
Do not choose a product simply because it feels slippery.
A lubricant needs to be compatible with the mechanism and the operating environment.
Inspect for Rust After Cleaning
Once dirt and grease are removed, corrosion can become easier to see.
Pay attention to:
- Threads
- Jaw surfaces
- Corners
- Scratches
- Exposed steel
- Areas around the adjustment screw
Light surface rust may be treated using a suitable method.
Deep pitting is more concerning.
If corrosion has removed significant material from the threads or jaws, cleaning cannot restore what has already been lost.
A tool with severe corrosion should be carefully evaluated before returning to use.
How to Deal With Surface Rust
If light rust appears, first clean away dirt and grease.
Then choose a corrosion-removal method appropriate for the wrench’s material and finish.
Avoid aggressive sanding on a chrome-plated surface simply to eliminate every trace of discoloration.
For bare steel, mechanical rust removal may be more practical, but it should still be controlled.
The objective is to remove corrosion while preserving sound metal.
After treatment, dry the wrench thoroughly and apply suitable corrosion protection when necessary.
Protect the Handle
Although the handle is not a moving mechanical component, it still deserves inspection.
Look for:
- Cracks
- Deformation
- Chemical damage
- Excessive wear
- Sharp edges
- Loose coatings
If the handle has a rubberized or plastic surface, avoid harsh solvents unless they are specifically confirmed to be compatible.
A clean handle should remain easy to grip.
If the surface becomes sticky or slippery after cleaning, remove any remaining residue and reassess the cleaning product being used.
Clean the Jaw Faces Carefully
The jaws need to remain capable of gripping the fastener securely.
Remove dirt and residue without grinding or reshaping the contact surfaces.
Do not use aggressive abrasives to remove minor discoloration.
Deep scratches or deformation are different problems and cannot be solved by cleaning.
Inspect the jaw alignment while the wrench is closed around an appropriate test object only when doing so is safe and consistent with the tool’s intended use.
Do not deliberately overload the wrench merely to test it.
Avoid Using an Adjustable Wrench as a Hammer
A common misuse is striking the handle or jaw of an adjustable wrench.
The tool is designed to grip and turn compatible fasteners, not to serve as an impact tool.
Repeated striking can deform the jaws, damage the adjustment mechanism, or bend the body.
Use a hammer or another tool specifically designed for impact when impact work is required.
Proper use is an important part of tool maintenance because it prevents damage before it occurs.
Avoid Using an Adjustable Wrench as a Substitute for a Fixed Wrench
An adjustable wrench is versatile, but that does not make it ideal for every fastener.
A properly sized fixed wrench can provide a more precise fit in many situations.
If an adjustable wrench is not correctly positioned or adjusted, it may slip and damage the fastener.
Repeated slipping can also wear the jaws.
Use an adjustable wrench when its design is appropriate and position the jaws correctly before applying force.
How Tight Should the Moving Jaw Be?
The moving jaw should be adjusted so that it fits the fastener appropriately.
A loose fit can create movement between the wrench and fastener.
An overly tight adjustment may make the wrench awkward to reposition.
The important point is to minimize unnecessary movement while maintaining normal operation.
Do not use excessive force to compensate for poor adjustment.
If the jaw cannot be adjusted properly because the mechanism has become worn or damaged, the tool may no longer be reliable.
Storage Matters
Even a well-maintained adjustable wrench can develop corrosion if stored incorrectly.
Keep it:
- Clean
- Dry
- Organized
- Away from direct moisture
- Protected from unnecessary impacts
Do not put a wet wrench into a closed toolbox.
If the storage environment is humid, inspect the adjustment mechanism periodically.
Pay particular attention to the exposed threads because they contain recesses where moisture and dirt can accumulate.
How to Prevent Rust on the Adjustment Mechanism
The adjustment mechanism benefits from several simple habits.
Clean it before long periods of storage.
Dry it thoroughly.
Avoid excessive exposure to water.
Use appropriate corrosion protection when necessary.
Keep the toolbox dry.
Inspect the thread regularly.
If your garage is humid, environmental moisture control may be more effective than simply applying additional oil.
A suitable protective film can help, but it should not become a substitute for proper storage.
What If the Jaw Still Sticks?
If the jaw remains stiff after cleaning and appropriate lubrication, investigate further.
Possible causes include:
- Corrosion
- Damaged threads
- Bent components
- Material deformation
- Excessive wear
- Debris trapped deeper inside
Do not force the adjustment screw indefinitely.
If the mechanism becomes progressively harder to operate, stop using the wrench until the condition has been assessed.
A clean but mechanically damaged wrench can still be unreliable.
What If the Jaw Is Too Loose?
Excessive looseness can indicate wear in the adjustment mechanism.
Clean the wrench and inspect the screw and threads first.
If the mechanism still has excessive movement after proper maintenance, it may be worn.
Do not assume that tightening the mechanism aggressively will restore the original precision.
A worn worm screw or damaged thread may need replacement of the tool.
Can an Adjustable Wrench Be Used for Rust Removal?
The wrench can be cleaned and treated for surface corrosion, but rust removal should not alter its dimensions.
Avoid grinding the jaws or adjustment surfaces.
Removing metal from working surfaces can change the fit between the wrench and fastener.
For heavily corroded tools, replacement or professional evaluation may be more appropriate.
When an Adjustable Wrench Should Be Replaced
Consider replacement when the tool has:
- Severely damaged jaws
- Deep pitting
- Significant thread damage
- A bent body
- A cracked component
- Excessive permanent looseness
- A damaged adjustment screw
- Structural corrosion
The fact that a wrench can still move does not necessarily mean it is in good condition.
A reliable adjustable wrench needs both functional movement and sound working surfaces.
A Simple Maintenance Routine
For ordinary household use, the process can be straightforward.
After heavy use
Wipe away dirt, grease, and moisture.
During periodic inspection
Check the jaws, adjustment screw, threads, and handle.
When the mechanism becomes stiff
Clean it before adding lubricant.
After water exposure
Dry the wrench completely.
Before long-term storage
Clean, inspect, dry, and protect vulnerable metal.
During humid seasons
Pay closer attention to corrosion and storage conditions.
This approach prevents minor contamination from becoming a mechanical problem.
A Five-Minute Adjustable Wrench Check
When the tool only needs routine attention:
1. Inspect the jaws.
Look for wear and damage.
2. Wipe the wrench.
Remove visible contamination.
3. Brush the adjustment mechanism.
Clear loose debris.
4. Move the jaw gently.
Check for abnormal resistance.
5. Inspect the threads.
Look for rust and damage.
6. Lubricate only if appropriate.
Use a small amount.
7. Wipe away excess.
Keep the wrench clean rather than greasy.
8. Store it dry.
This simple routine can prevent many common adjustment problems.
Common Maintenance Mistakes
Adding oil to a dirty mechanism
This traps more contamination.
Over-tightening the moving jaw
This can increase stress and may not solve underlying wear.
Using aggressive abrasives on chrome
This can damage the finish.
Forcing a seized adjustment screw
It may worsen mechanical damage.
Grinding the jaws
This can permanently change the wrench’s working geometry.
Leaving the wrench wet
Moisture can lead to corrosion.
Using the wrench as an impact tool
This can deform the tool.
Ignoring excessive play
A loose adjustment mechanism can indicate wear rather than a need for lubrication.
Final Thoughts
An adjustable wrench can last for many years with relatively simple maintenance.
The most important area to keep clean is the adjustment mechanism. Dirt, old grease, metal particles, and corrosion can make the moving jaw increasingly difficult to operate, but adding more lubricant without cleaning the mechanism can make the problem worse.
Start with inspection.
Remove loose dirt.
Clean the exposed threads carefully.
Check the worm screw and moving jaw.
Dry the wrench completely.
Then decide whether the mechanism needs a small amount of appropriate lubrication.
The jaws deserve equal attention. They need to remain aligned and free from excessive wear so they can engage fasteners correctly. Avoid grinding or reshaping them simply to remove cosmetic imperfections.
Storage also matters. Keeping the wrench clean and dry, especially in a humid garage, can prevent corrosion from returning.
Most importantly, know the difference between a maintenance problem and a worn-out tool. Cleaning can remove contamination. Lubrication can reduce friction where appropriate. Neither can restore metal that has been lost through severe corrosion or wear.
A well-maintained adjustable wrench should move smoothly, hold its adjustment reliably, maintain sound jaw surfaces, and remain easy to inspect.
That combination of clean mechanics, appropriate lubrication, controlled storage, and regular inspection is what turns a simple adjustable wrench into a dependable long-term tool.
Related Guides
- How to Maintain Screwdrivers So They Last Longer
- How to Maintain Pliers and Keep Their Joints Moving Smoothly
- How to Remove Dirt From Tool Hinges, Pliers, and Adjustable Joints
- How to Clean Greasy Wrenches, Pliers, and Sockets at Home
- How to Tell Whether a Dirty Tool Needs Cleaning, Lubrication, or Replacement
FAQ
Why is my adjustable wrench difficult to open?
Possible causes include dirt in the adjustment mechanism, dried grease, corrosion, damaged threads, or mechanical wear. Cleaning the mechanism before applying additional lubricant is a sensible first step.
Should I oil the threads of an adjustable wrench?
If the tool’s design and manufacturer recommendations call for lubrication, a small amount of suitable lubricant may be appropriate. Clean the mechanism first and avoid excessive application.
Can I use WD-40 on an adjustable wrench?
Different products under the WD-40 brand have different formulations and purposes. Check the specific product label and compatibility with the tool before using it as a cleaner, lubricant, or corrosion inhibitor.
Why does my adjustable wrench have too much play?
Excessive movement can result from wear in the adjustment mechanism, damaged threads, or other mechanical problems. Cleaning may remove contamination, but it will not restore metal that has already worn away.
Can I sand the jaws of an adjustable wrench?
Aggressive sanding can alter the geometry of the jaws and affect how the tool fits a fastener. Avoid removing sound metal simply to improve appearance.
How do I prevent an adjustable wrench from rusting?
Keep it clean and dry, avoid storing it while wet, inspect the exposed adjustment mechanism, control storage humidity where necessary, and use appropriate corrosion protection on vulnerable metal.
Can I soak an adjustable wrench in degreaser?
It is generally better to use controlled application unless the manufacturer specifically approves immersion. Soaking can expose handles and mechanical components to chemicals unnecessarily and may create drying problems.
What should I do if the adjustment screw is completely seized?
Do not force it aggressively. Inspect the mechanism for severe corrosion or damage and use only a method appropriate for the tool and manufacturer’s recommendations. A severely compromised mechanism may require professional evaluation or replacement.
How often should I maintain an adjustable wrench?
There is no universal calendar. Inspect and clean it when contamination becomes visible, after heavy or wet work, during periodic toolbox maintenance, and before long-term storage.
When should I replace an adjustable wrench?
Consider replacement when the jaws are severely damaged, the adjustment mechanism is excessively loose or damaged, the body is bent or cracked, or corrosion has caused significant material loss.
