
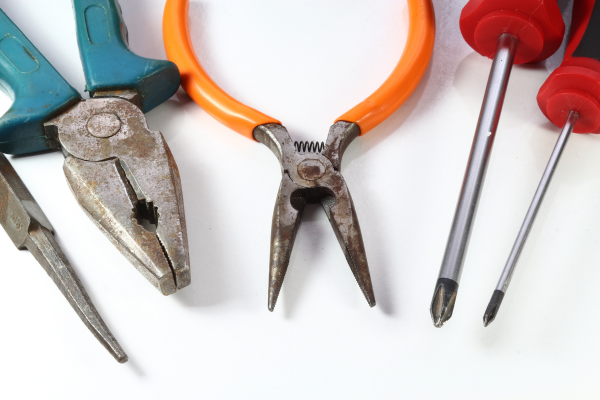
Buying used hand tools can be an excellent way to build a practical toolbox without spending as much as you would on new equipment. Older wrenches, pliers, screwdrivers, hammers, clamps, files, and other tools can still have many years of useful service left in them.
The challenge is that appearance alone does not tell you whether a used tool is actually worth keeping.
A tool can look old and still be mechanically excellent. On the other hand, a tool that looks reasonably clean can have worn working surfaces, cracks, excessive looseness, deep corrosion, or other problems that make it unsuitable for its intended purpose.
That is why every used hand tool should be inspected before it joins your regular toolbox.
The inspection does not need to be complicated. A systematic check of the tool’s material, working surfaces, moving parts, handles, corrosion, and overall condition can help you separate genuine bargains from tools that will require more money and effort than they are worth.
This guide explains how to evaluate used hand tools before cleaning, restoring, organizing, and putting them into regular service.
Why Used Tools Need a Careful Inspection
Used tools have an unknown history.
You may not know:
- How often they were used
- What they were used for
- Whether they were overloaded
- Whether they were exposed to moisture
- Whether they were repaired previously
- Whether they were modified
- How they were stored
- Whether they were subjected to chemicals or excessive heat
That history matters because some forms of damage are easy to see while others are less obvious.
A scratched wrench may be perfectly usable.
A wrench with severely worn jaws may not be.
A rusty screwdriver shaft may be mostly cosmetic.
A screwdriver with a severely damaged tip may be unreliable.
The inspection should therefore focus on function and condition, not simply appearance.
Start With the Overall Condition
Before examining individual parts, look at the entire tool.
Ask:
Does the tool still resemble its original design?
Are any components missing?
Is anything bent or cracked?
Is there excessive corrosion?
Does the tool appear to have been modified?
Are the working surfaces intact?
This first inspection helps identify obvious problems before you spend time cleaning the tool.
There is little benefit in spending an hour restoring a tool that is structurally compromised.
Check for Signs of Abuse
Used tools can show clues about how they were treated.
Look for:
- Hammer marks on inappropriate surfaces
- Bent shafts
- Deep scratches
- Severely rounded edges
- Distorted jaws
- Cracked handles
- Excessive corrosion
- Improvised repairs
A screwdriver with a heavily mushroomed or damaged handle may have been used as a striking tool.
A wrench with distorted jaws may have been overloaded or improperly used.
Pliers with unusually damaged gripping surfaces may have been subjected to tasks beyond their intended purpose.
These clues do not automatically mean the tool is unusable, but they deserve closer examination.
Inspect the Working Surface First
The working portion of a tool is usually more important than cosmetic condition.
For a wrench, inspect the jaws.
For pliers, inspect the gripping or cutting surfaces.
For a screwdriver, inspect the tip.
For a hammer, inspect the head and striking face.
For a file, inspect the teeth.
Ask whether the working surface still has the geometry required for the tool’s intended task.
This is especially important because cleaning can improve appearance without restoring damaged working surfaces.
A worn tool can look excellent after restoration and still perform poorly.
Examine Wrenches Carefully
Used wrenches deserve inspection around their working ends.
Look for:
- Rounded corners
- Deformed jaws
- Cracks
- Deep pitting
- Excessive wear
- Bending
- Severe corrosion
For combination wrenches, inspect both the open end and box end.
For adjustable wrenches, inspect the adjustment mechanism and moving jaw.
A wrench should maintain the appropriate shape needed to engage the fastener.
A heavily rounded wrench can slip and damage both the tool and fastener.
Do not assume that polishing the surface will restore a worn working edge.
Inspect Pliers
With used pliers, start with the pivot.
Open and close the handles gently.
Check whether movement is smooth and consistent.
Look for:
- Excessive side-to-side movement
- Stiffness
- Rust
- Damaged pivot hardware
- Cracked handles
- Damaged jaws
- Worn cutters
Next, inspect the gripping surfaces.
The jaws should remain appropriately aligned for their intended function.
If the tool has cutters, inspect the cutting edges for chips, deformation, and excessive wear.
A small amount of cosmetic wear is expected on a used tool. Significant damage is a different issue.
Examine Screwdrivers
Screwdrivers are relatively easy to inspect because their critical parts are visible.
Check the tip first.
Look for:
- Rounded edges
- Chipped corners
- Deformation
- Severe wear
- Incorrect reshaping
Then inspect the shaft for bending and corrosion.
Finally, inspect the handle.
Look for:
- Cracks
- Separation
- Chemical damage
- Unusual movement
- Excessive wear
A screwdriver with a worn tip may not be worth restoring if replacement is inexpensive.
For a specialty or high-quality screwdriver, however, the decision may be different.
Inspect Hammers
A used hammer should be examined more carefully because it is designed for repeated impact.
Check the head.
Look for:
- Cracks
- Severe corrosion
- Deformation
- Damaged striking surfaces
- Abnormal mushrooming
Then inspect the handle.
For wood, look for:
- Splitting
- Cracks
- Loose sections
- Severe dents
- Damage around the head
For fiberglass or composite handles, look for cracks, cuts, separation, or other visible damage.
The head should remain securely attached.
Do not buy or use a hammer simply because the metal head looks good if the handle connection is questionable.
Inspect Adjustable Tools
Adjustable wrenches, pliers, and other mechanisms require additional attention.
Move the adjustment mechanism gradually.
Look for:
- Excessive play
- Rough movement
- Damaged threads
- Corrosion
- Broken components
- Poor alignment
A little dirt can often be cleaned.
A damaged thread cannot be restored simply by lubrication.
Do not force an adjustment mechanism during inspection.
The objective is to determine its condition, not to make it move through brute force.
Examine the Handle Material
Handles deserve the same attention as metal components.
Used tools may have:
- Plastic handles
- Rubberized grips
- Wooden handles
- Fiberglass
- Composite materials
Look for cracks, chemical damage, swelling, splitting, and separation.
A slightly dirty handle is not a major concern.
A structural crack can be.
Do not assume that a replacement handle is always simple or economical. The decision depends on the tool’s design and value.
Look for Deep Rust
Surface rust is often manageable.
Deep corrosion is more concerning.
Inspect for:
- Deep pits
- Flaking metal
- Severe thinning
- Corrosion around joints
- Corrosion on working surfaces
- Material loss
Rust consumes metal.
Removing the visible corrosion does not recreate the material that has already disappeared.
A heavily pitted tool may therefore be unsuitable even if it can be made visually attractive.
Check for Corrosion Under Dirt
Sometimes the apparent condition of a used tool is difficult to determine because grease and dirt cover the surface.
Before making a final decision, clean enough of the tool to inspect the important areas.
You do not necessarily need to perform a complete restoration.
Remove a small amount of contamination around:
- Working surfaces
- Joints
- Threads
- Handle connections
- Corrosion-prone edges
This can reveal whether the tool has simple surface contamination or more serious damage underneath.
Watch for Improvised Repairs
Used tools sometimes have modifications that are not part of the original design.
Look for:
- Welded components
- Drilled holes
- Ground surfaces
- Replacement fasteners
- Glued handles
- Bent-back components
- Unusual modifications
A modification does not automatically make a tool unusable.
However, it should make you investigate more carefully.
Ask why the repair was made and whether it affects the tool’s structural integrity or intended function.
An improvised repair on a non-critical cosmetic component is different from a modification to a load-bearing or working surface.
Check Whether the Tool Has Been Overheated
Some metal tools may have been exposed to excessive heat during previous use or modification.
Heat can potentially affect finishes and, depending on the tool and circumstances, the properties of the material.
Visible discoloration alone does not tell you exactly what happened.
However, unusual heat marks combined with grinding, welding, or deformation are reasons to inspect the tool more carefully.
For critical tools, an uncertain history can be a reason to choose a different tool rather than assume that everything is fine.
Look at the Tool’s Markings
Manufacturer markings can provide useful information.
Check for:
- Brand
- Model
- Size
- Material designation
- Country of manufacture
- Other identification markings
Do not assume that a famous brand automatically means the used tool is in excellent condition.
Brand matters less than actual condition.
However, markings can help you identify the tool and locate the manufacturer’s information if maintenance instructions or specifications are needed.
Check Whether Replacement Parts Are Available
This is particularly useful for older or specialty tools.
Before buying a used tool that needs repair, consider whether replacement components are still available.
Examples include:
- Handles
- Springs
- Pivot hardware
- Blades
- Replacement jaws
A tool may appear inexpensive until you discover that the necessary repair parts are difficult to obtain.
For a common hand tool, replacement may be easier.
For a quality specialty tool, repair may still be worthwhile.
Consider the Cost of Restoration
A used tool is not automatically a bargain.
Think about the total cost.
For example:
Purchase price
plus
Cleaning products
plus
Rust treatment
plus
Replacement parts
plus
Your time
equals the actual restoration cost.
If a new tool with a warranty costs only slightly more, buying new may be more practical.
If the used tool is high quality and structurally sound, restoration can make excellent sense.
The decision depends on more than the initial price.
Test the Tool Without Abusing It
After visual inspection, perform a basic functional check.
Do not intentionally overload the tool.
Instead, verify normal movement.
For a wrench, inspect the adjustment or jaws.
For pliers, open and close the handles.
For a screwdriver, inspect the tip and handle rather than forcing a difficult fastener.
For a hammer, check the head-to-handle connection.
For a measuring tool, inspect the blade, hook, markings, and mechanism.
The purpose of the test is to identify abnormalities without creating new damage.
Know Which Defects Are Cosmetic
Used tools naturally show signs of use.
Examples can include:
- Scratches
- Faded finishes
- Minor discoloration
- Small dents
- Surface wear
These defects may have little effect on function.
Do not reject a mechanically sound tool simply because it does not look new.
The more useful question is:
Does this defect affect the tool’s working surface, structural integrity, or reliable operation?
That distinction can save money and prevent unnecessary restoration work.
Know Which Defects Are Functional
Functional defects deserve considerably more attention.
Examples include:
- Worn wrench jaws
- Severely rounded screwdriver tips
- Excessively loose plier pivots
- Bent shafts
- Damaged threads
- Cracked handles
- Loose hammer heads
- Significant cutting-edge damage
These are not merely cosmetic.
They can affect how the tool performs.
A used tool with a functional defect may require repair or replacement before it belongs in your main toolbox.
Create Three Categories
A simple classification system can make used-tool evaluation easier.
Ready for Cleaning
These tools appear structurally sound but dirty, rusty, greasy, or otherwise neglected.
Worth Restoring
These tools have manageable defects but retain good working surfaces and structural integrity.
Reject or Replace
These tools have significant damage, excessive wear, severe corrosion, or unreliable mechanisms.
This prevents you from mixing questionable tools with equipment that is ready for normal use.
Inspect Before Bringing Used Tools Into Your Main Toolbox
Do not place newly acquired tools directly into your main storage system.
First inspect and clean them separately.
This prevents:
- Rust from spreading
- Grease from contaminating clean tools
- Dirt from entering drawers
- Damaged equipment from disappearing among good tools
A small temporary area for newly acquired tools can make this process much easier.
Once they have passed inspection and maintenance, move them into their permanent location.
Clean Before Final Evaluation
A proper cleaning can reveal much more than the initial inspection.
Remove:
- Loose dirt
- Grease
- Adhesive
- Surface contamination
- Loose corrosion
Then inspect the tool again.
You may discover that what looked like severe rust was mostly dirt.
You may also discover the opposite: what appeared to be a small stain may actually be deep corrosion.
Cleaning therefore serves as a second inspection stage.
Check the Storage History When Possible
If you are buying from someone directly, simple questions can provide useful information.
Ask:
How was the tool stored?
Was it used professionally or occasionally?
Was it exposed to water?
Has anything been repaired?
Why are you selling it?
You will not always receive complete or accurate answers.
Still, the information can provide context.
A tool stored in a dry workshop for years may have a very different maintenance history from one left outdoors.
Be Careful With Collectible or Vintage Tools
Older tools can have significant practical or collectible value.
Avoid aggressive restoration before understanding the tool.
Grinding, polishing, repainting, or replacing original components can reduce historical or collectible value even if the tool looks better afterward.
For vintage equipment, document the original condition before making changes.
If preservation matters, consider specialist advice.
The approach used for a common modern wrench should not automatically be applied to a collectible tool.
Tools With Unknown Safety Histories
Some tools deserve extra caution when their previous use is completely unknown.
This is especially true for tools that:
- Deliver impact
- Hold heavy loads
- Cut
- Clamp under force
- Have structural safety functions
If you cannot establish whether the tool has suffered significant damage, consider whether it is worth taking the risk.
A cheap used tool is not a bargain if its unknown history makes it unsuitable for the job.
A Practical Used-Tool Inspection Checklist
Before adding a used hand tool to your toolbox, check:
Overall condition
Does it retain its original shape?
Working surfaces
Are the jaws, tips, edges, or striking surfaces intact?
Moving components
Do pivots and adjustment mechanisms operate normally?
Handles
Are they structurally sound?
Corrosion
Is the rust superficial or has material been lost?
Repairs
Are there signs of welding, drilling, grinding, gluing, or other modifications?
Markings
Can the tool be identified?
Function
Does it perform its intended movement without abnormal resistance or looseness?
Restoration cost
Will cleaning and repairs still make economic sense?
If the answers are favorable, the tool may be a good candidate for restoration.
A Simple Decision Formula
When deciding whether to keep a used tool, consider four things:
Condition
How much wear or damage exists?
Function
Can it still perform its intended job reliably?
Restoration
How much work is required?
Value
Is the result worth the time and money?
A good used tool typically scores well across all four.
A poor candidate usually has serious problems in at least one category.
Final Thoughts
Used hand tools can be excellent additions to a household toolbox, but the purchase should not end when you hand over the money.
Inspection is what determines whether you have found a useful tool or simply acquired another restoration project.
Start with the overall condition, then focus on the working surfaces. Check wrenches for rounded jaws, pliers for pivot wear and damaged jaws, screwdrivers for worn tips, and hammers for secure head-to-handle connections.
Inspect handles, threads, moving mechanisms, corrosion, and signs of previous repairs.
Do not automatically reject a tool because it looks old. Minor scratches, faded finishes, and cosmetic wear are often acceptable on used equipment.
At the same time, do not confuse a clean appearance with good condition. Structural cracks, severe corrosion, damaged working surfaces, excessive looseness, and significant deformation deserve much more attention.
Cleaning should be considered part of the evaluation. Once dirt and grease are removed, the true condition of the tool becomes easier to see.
Finally, consider the total cost of restoration. A high-quality used tool with manageable corrosion may be an excellent purchase. A heavily damaged tool that requires extensive repair may cost more in time and money than simply buying a reliable replacement.
The best used tools are not necessarily the oldest, newest, or most attractive.
They are the ones that remain structurally sound, mechanically reliable, appropriate for the intended task, and worth the effort required to maintain them.
Related Guides
- How to Tell Whether a Dirty Tool Needs Cleaning, Lubrication, or Replacement
- How to Maintain Screwdrivers So They Last Longer
- How to Maintain Pliers and Keep Their Joints Moving Smoothly
- How to Maintain an Adjustable Wrench
- How to Restore a Rusty Hand Tool Step by Step
FAQ
Should I clean a used hand tool before inspecting it?
A quick initial inspection should come first so you can identify obvious damage. After that, cleaning the important areas can reveal corrosion, wear, or other problems hidden under dirt and grease.
How do I know if a used tool is worth buying?
Consider its structural condition, working surfaces, mechanical function, restoration requirements, and replacement cost. A tool with cosmetic wear but sound working components can be a better purchase than a newer-looking tool with serious damage.
Is surface rust acceptable on a used tool?
Light surface rust does not automatically make a tool unusable. The important question is whether corrosion has caused deep pitting, material loss, or damage to a critical working surface.
Should I buy a used hammer with a loose head?
A hammer with a loose or questionable head should not be treated as ready for use. Determine whether the construction allows a proper repair and whether the tool is worth restoring; otherwise, choose a tool with a secure head-to-handle connection.
How can I tell if used pliers are worn out?
Inspect the pivot for excessive looseness, check whether the jaws meet and align properly, and look at the gripping or cutting surfaces for significant wear or damage. Smooth movement alone does not guarantee that the tool is in good condition.
Should I restore a rusty used screwdriver?
If the corrosion is superficial and the tip, shaft, and handle remain structurally sound, restoration may make sense. Deep corrosion, significant material loss, or a badly worn tip may justify replacement instead.
What signs suggest that a used wrench has been abused?
Look for heavily rounded jaws, deformation, cracks, deep scratches in working areas, unusual bending, or signs of grinding or other modifications. These clues suggest that the tool deserves a more detailed inspection.
Can I put used tools directly into my main toolbox?
It is better to inspect and clean them first. Keeping newly acquired tools separate during evaluation prevents dirt, grease, and rust from spreading to tools that are already clean.
Are older tools necessarily lower quality?
No. Age alone does not determine condition or quality. An older tool can be very durable and mechanically sound, while a newer tool can have significant damage or wear.
When should I reject a used tool instead of restoring it?
Consider rejecting or replacing it when there is significant structural damage, severe corrosion, badly damaged working surfaces, excessive mechanical wear, or an uncertain condition that makes reliable use questionable.
