
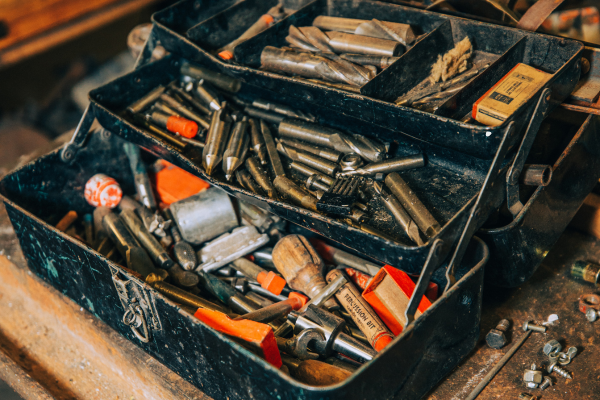
A toolbox can gradually become one of the dirtiest places in a home workshop without looking particularly dirty from the outside. Oil from hand tools, dust from sanding or drilling, metal shavings, wood particles, adhesive residue, and small pieces of debris can collect underneath tools and in corners that are rarely inspected.
The problem is not only cosmetic. A dirty toolbox can transfer contamination back onto clean tools, hide early signs of rust, interfere with drawers and latches, and create an environment where moisture and debris remain in contact with metal surfaces.
Cleaning the toolbox itself is therefore an important part of tool maintenance.
The process does not require expensive equipment. What matters most is emptying the toolbox completely, separating loose debris from oily contamination, cleaning the storage surfaces according to their material, drying everything thoroughly, and reorganizing the tools in a way that makes future maintenance easier.
This guide explains how to clean a toolbox after oil, dust, and metal shavings have accumulated, while reducing the risk of damaging the toolbox or the tools stored inside it.
Why Cleaning the Toolbox Matters
Most people think about cleaning the tools and forget about the storage system.
That can create a cycle where a clean wrench is placed into a dirty drawer and immediately picks up grease or dust again.
The bottom of a toolbox can also accumulate metal shavings that are difficult to see under larger tools. Small particles may remain in corners for months.
Moisture can become trapped underneath accumulated dirt, increasing the risk of corrosion on both the toolbox and the tools inside it.
A dirty toolbox can also make it harder to notice problems.
For example, a small rust-colored patch at the bottom of a drawer might be dismissed as dirt when it could actually indicate corrosion beginning on a tool or on the drawer itself.
Cleaning gives you an opportunity to inspect the entire storage system rather than simply removing visible dirt.
Empty the Toolbox Completely
The first step is simple but important:
Remove everything.
Trying to clean around tools usually produces a poor result because debris remains underneath and between them.
Place the tools somewhere clean and dry while the toolbox is being cleaned.
If the toolbox contains many small accessories, organize them temporarily rather than dumping everything into one pile.
You can group:
- Hand tools
- Fasteners
- Sockets
- Cutting accessories
- Measuring tools
- Electrical accessories
- Small hardware
This makes it easier to return everything to the appropriate location later.
It also gives you an opportunity to identify tools that need individual cleaning before they go back into storage.
Inspect the Tools Before Returning Them
Do not immediately put every tool back after cleaning the toolbox.
Instead, inspect the tools while they are outside.
Look for:
- Grease
- Dust
- Metal particles
- Rust
- Damaged handles
- Worn working surfaces
- Moisture
- Sticky residue
A tool covered with oil or metal shavings can contaminate a freshly cleaned toolbox again.
It is much easier to solve those problems now than after the storage system has been reorganized.
This is also a good opportunity to separate tools that need maintenance from tools that are ready to return to storage.
Start With Loose Debris
Once the toolbox is empty, begin with dry cleaning.
Use a soft brush, vacuum, or another suitable method to remove loose dust and debris.
Pay particular attention to:
- Drawer corners
- Seams
- Hinges
- Rails
- Handles
- Lock mechanisms
- Compartments
- The bottom of the main storage area
Metal shavings are particularly important to remove.
Fine metal particles can migrate onto other tools and may become embedded in oily residue.
A vacuum can be useful for collecting loose material without spreading it around.
When using compressed air, remember that it can send fine particles into the air and into nearby equipment. Use appropriate eye protection and ventilation.
The goal of this first stage is to remove everything that can be removed without introducing water or cleaning chemicals.
Be Careful With Metal Shavings
Metal shavings can be sharper than they appear.
Do not pick them up casually with bare hands.
Use appropriate tools or collection methods for the type and quantity of debris.
Large shavings can be collected carefully, while finer particles may be easier to remove with a suitable vacuum.
Pay special attention to drawer corners because small particles often accumulate there.
If the toolbox contains magnetic metal accessories, some shavings may cling to them and require additional cleaning.
Do not sweep metal particles deeper into drawer mechanisms.
The objective is to remove them from the toolbox completely.
Cleaning Dust and Wood Particles
Not all workshop debris is metallic.
Wood dust, drywall dust, dirt, and other fine particles can collect under tools.
Dry removal is usually the best first step.
Use a soft brush or vacuum to remove the loose material.
If the dust has mixed with oil, it becomes a different problem and should be treated as oily contamination rather than ordinary dust.
Avoid immediately adding water to a dusty surface covered with oil.
That can create a sticky paste that is harder to remove.
How to Deal With Oil and Grease
Once loose debris has been removed, inspect the toolbox for oily areas.
Fresh oil can often be wiped away with absorbent material.
Use disposable towels or suitable shop cloths to remove the bulk of the contamination before applying a cleaner.
This is important because using a wet cloth immediately can simply spread grease around the entire drawer.
Work from relatively clean areas toward the dirtiest areas.
Replace or reposition the cloth frequently when it becomes saturated.
The objective is to remove the oil rather than redistribute it.
Choosing the Right Cleaner
The appropriate cleaner depends on what the toolbox is made from.
Common toolbox materials include:
- Painted steel
- Powder-coated metal
- Stainless steel
- Plastic
- Composite materials
A cleaner that is safe for bare metal may affect paint, coatings, or plastics.
Check the toolbox manufacturer’s maintenance instructions when available.
If you do not know what material or coating you are dealing with, start with a mild detergent solution and test an inconspicuous area.
The least aggressive effective method is usually the best starting point.
Cleaning a Painted or Powder-Coated Toolbox
Many metal toolboxes have a painted or powder-coated finish.
These coatings help protect the metal underneath, so aggressive cleaning can do more harm than good.
Use a soft cloth or sponge with a mild cleaning solution.
Avoid abrasive pads that can scratch the coating.
If there is a stubborn oily area, use a compatible degreaser according to its instructions.
Do not allow strong chemicals to remain on the surface longer than recommended.
After cleaning, wipe the area with a clean damp cloth when appropriate and dry it thoroughly.
Pay attention to scratches or chips in the coating. These areas deserve monitoring because exposed metal can become a starting point for corrosion.
Cleaning Plastic Toolboxes
Plastic toolboxes can usually be cleaned with mild soap and water, but the plastic itself can vary significantly between products.
Avoid strong solvents unless the manufacturer specifically indicates that they are compatible.
Some chemicals can cause plastic to become brittle, cloudy, soft, or discolored.
Use a soft brush for textured surfaces.
Do not use abrasive tools simply because plastic appears easy to scratch.
The objective is to remove contamination while preserving the surface.
Cleaning Drawer Rails and Moving Parts
Tool chests with drawers have another maintenance area that is easy to overlook.
Dust, metal particles, and grease can accumulate around drawer rails.
Inspect the rails while the drawers are removed or opened.
Do not flood the mechanism with cleaning liquid.
Remove loose debris first.
If the manufacturer recommends lubrication, use the appropriate product and quantity.
Avoid applying large amounts of oil simply because the drawer feels slightly stiff.
Too much lubricant can attract dust and create a new buildup problem.
If a drawer remains difficult to operate after cleaning, inspect the rails for damage, misalignment, or obstruction.
Clean the Corners and Seams
Corners are where many toolbox cleaning attempts fail.
A flat cloth may clean the center of a drawer while leaving a layer of debris in the corners.
Use a small soft brush, cotton swab, or another suitable cleaning tool to reach these spaces.
Look especially closely around:
- Drawer edges
- Hinges
- Seams
- Handles
- Lock areas
- Compartment dividers
These locations can hold both dust and moisture.
Cleaning them thoroughly can make a significant difference to the overall condition of the toolbox.
Do Not Ignore the Toolbox Lid
If the toolbox has a hinged lid, inspect the inside.
The lid can collect dust and grease just like the drawers.
Check:
- Interior panels
- Gasket areas
- Hinges
- Latches
- Storage pockets
- Foam inserts
If the lid includes a rubber seal, use a cleaning method compatible with the material.
Avoid aggressive solvents unless the manufacturer recommends them.
A damaged seal can allow moisture to enter the toolbox during storage or transport.
Foam Inserts and Tool Organizers
Many toolboxes use foam inserts, plastic trays, or drawer liners to organize tools.
These materials require their own cleaning approach.
Remove the insert when possible.
Shake or vacuum loose debris first.
For washable materials, use an appropriate mild cleaning method.
Do not soak foam inserts unless the material and manufacturer instructions allow it.
Foam can hold water for a surprisingly long time, and placing damp foam back into a closed toolbox creates a poor storage environment for metal tools.
Allow inserts to dry completely before reinstalling them.
Handling Rust Inside the Toolbox
While cleaning, look for signs of corrosion.
Rust-colored marks may appear:
- Under tools
- Around scratches
- Near seams
- On drawer bottoms
- Around fasteners
- Near areas exposed to moisture
If the toolbox itself has started to rust, cleaning the surface does not necessarily solve the problem.
Light surface corrosion may be treatable depending on the material and coating.
However, if corrosion is spreading beneath a protective coating or causing structural deterioration, a more comprehensive repair may be necessary.
Do not simply paint over active rust without addressing the underlying condition.
Dry the Toolbox Completely
After wet cleaning, drying is essential.
Use clean towels to remove visible moisture.
Then leave drawers and compartments open so trapped moisture can evaporate.
Pay attention to seams, corners, rails, hinges, and other areas where liquid can remain.
Do not rush to close the toolbox simply because the main surfaces look dry.
A closed environment can trap moisture.
The same principle applies to removable liners and foam organizers.
Everything should be dry before the toolbox is reassembled.
Inspect the Toolbox Before Reassembly
Once everything is clean and dry, inspect the empty toolbox.
Look for:
- Chipped paint
- Scratches
- Rust
- Damaged drawer rails
- Loose screws
- Broken latches
- Damaged seals
- Cracked plastic
- Bent sections
Small maintenance issues are easier to address when the toolbox is empty.
For example, a loose drawer handle can be tightened immediately rather than continuing to use the toolbox until it becomes a larger problem.
Organizing the Tools After Cleaning
Once the toolbox is clean, avoid simply putting everything back where it originally was.
Think about how the tools are actually used.
Frequently used tools should be easy to reach.
Tools that can become dirty together can be grouped logically.
Sharp accessories should be stored in a way that protects both the edges and nearby tools.
Small hardware should have dedicated containers rather than being allowed to spread across drawers.
A well-organized toolbox reduces the amount of time tools spend rubbing against one another and can also make future cleaning easier.
Separate Dirty and Clean Accessories
Some workshops contain tools that are regularly exposed to grease, paint, adhesives, or other contaminants.
Consider whether these need a separate storage area.
A tool used for dirty automotive work does not necessarily need to share the same drawer as clean precision tools.
Separating contamination sources can dramatically reduce how quickly the toolbox becomes dirty again.
This does not require multiple toolboxes.
Even separate trays, containers, or drawer sections can help.
How Often Should a Toolbox Be Cleaned?
There is no universal schedule.
A toolbox used occasionally for household repairs may need only occasional deep cleaning.
A workshop toolbox used every day can require more frequent attention.
A practical approach is to perform:
Quick cleanup: after particularly dirty jobs.
Inspection: periodically while organizing tools.
Deep cleaning: when visible oil, dust, or debris begins accumulating.
Full maintenance: whenever the storage system becomes difficult to operate or corrosion appears.
The environment matters too.
A humid garage may require more frequent inspection than a climate-controlled indoor storage area.
A Simple Toolbox Cleaning Routine
A practical routine can be divided into several levels.
After a dirty project
Wipe heavily contaminated tools before returning them to storage.
Remove visible debris from the toolbox.
During normal maintenance
Empty a drawer or storage compartment periodically and remove accumulated dust and shavings.
During a deep cleaning
Remove all tools, clean every compartment, inspect the toolbox itself, and allow everything to dry completely.
Before long-term storage
Make sure both the tools and the toolbox are clean and dry.
This approach prevents the need for large restoration jobs later.
Common Toolbox Cleaning Mistakes
Cleaning around the tools instead of removing them
This leaves hidden contamination behind.
Using too much water
Excess moisture creates unnecessary drying problems.
Using strong solvents on unknown coatings
The finish may be damaged.
Ignoring the toolbox itself
A clean tool in a dirty environment will become dirty again.
Returning wet foam inserts
This can trap moisture inside the closed storage system.
Applying too much lubricant to drawer rails
Excess lubricant attracts dust.
Mixing cleaning chemicals
Different products should not be mixed unless their manufacturers specifically indicate compatibility.
How to Keep the Toolbox Cleaner
Once the toolbox has been restored to a clean condition, prevention becomes easier.
Wipe tools before storage when they have been exposed to grease.
Do not place wet tools directly into closed drawers.
Remove loose metal shavings after projects that produce them.
Keep oily rags and contaminated materials out of tool drawers.
Periodically inspect the bottom of drawers and storage trays.
Use organizers that can be removed and cleaned easily.
Small habits make a large difference.
Final Thoughts
A toolbox is part of your tool-maintenance system, not merely a container.
When oil, dust, metal shavings, and other debris accumulate inside it, the storage environment can begin contributing to the very problems you are trying to prevent. Clean tools can become dirty again, moisture can remain hidden, and early signs of corrosion can be overlooked.
The best cleaning process starts with completely emptying the toolbox and inspecting the tools separately. Remove loose debris before dealing with grease, choose a cleaner that is compatible with the toolbox’s material, and avoid aggressive chemicals and abrasives unless they are genuinely necessary.
Give special attention to corners, drawer rails, hinges, seals, liners, and areas underneath organizers. These are easy to overlook but often hold the most contamination.
Most importantly, make sure everything is completely dry before putting the toolbox back together.
A clean toolbox is easier to organize, easier to inspect, and much less likely to contaminate the tools stored inside it. More importantly, it creates a storage environment in which corrosion, dirt, and mechanical problems are easier to detect before they become significant.
Related Guides
- How to Clean Hand Tools After Heavy Use Without Damaging the Finish
- How to Clean Greasy Wrenches, Pliers, and Sockets at Home
- How to Remove Adhesive Residue From Metal Tools
- How to Prevent Rust on Hand Tools in a Humid Garage
- How to Store Screwdrivers, Pliers, and Wrenches So They Stay Easy to Find
FAQ
How often should I clean my toolbox?
The ideal frequency depends on how often the toolbox is used and how dirty the work environment is. A heavily used workshop toolbox may need frequent cleaning, while an occasional household toolbox may only need periodic deep cleaning and quick maintenance after messy projects.
How do I remove metal shavings from a toolbox?
Start with a suitable vacuum or carefully controlled dry-cleaning method. Metal shavings can be sharp, so avoid picking them up casually with bare hands. Pay particular attention to drawer corners and seams.
Can I wash a metal toolbox with water?
Some metal toolboxes can be cleaned with a mild water-based solution, but excessive water can enter seams, hinges, drawer rails, and other areas that are difficult to dry. Use controlled moisture and dry the toolbox thoroughly.
How do I remove grease from a toolbox drawer?
Remove the bulk grease with absorbent material first. Then use a cleaner compatible with the drawer’s material and finish. Work in small areas instead of spreading the grease across the entire drawer.
Should I lubricate toolbox drawer rails after cleaning?
Only when lubrication is appropriate for the specific drawer mechanism or recommended by the manufacturer. Too much lubricant can attract dust and create another buildup problem.
Can metal shavings cause rust?
Metal shavings themselves are not automatically a cause of rust, but they can trap moisture and contamination against surfaces. Removing them regularly helps keep the storage environment cleaner and makes corrosion easier to detect.
How do I clean foam toolbox liners?
Remove loose debris first and use only a cleaning method compatible with the specific foam material. Avoid returning a damp liner to a closed toolbox. Allow it to dry completely before reinstalling it.
What should I do if I find rust inside my toolbox?
First determine whether the corrosion is on the toolbox, a stored tool, or both. Clean the affected area and assess the severity. Light surface corrosion may be treatable, while corrosion that compromises a coating or structural component may require more comprehensive repair.
