
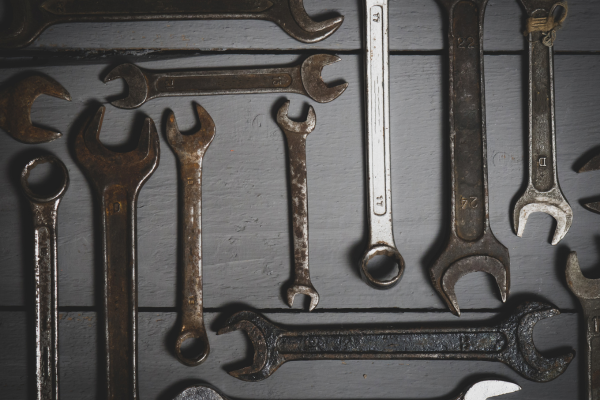
Rust is one of the most common problems affecting metal tools, especially those stored in garages, sheds, workshops, and other areas where humidity and temperature changes are common. A small amount of orange discoloration does not necessarily mean that a tool is damaged beyond use. In many cases, surface rust can be removed and the tool can continue working normally for years.
The situation is different when corrosion has removed a significant amount of metal or weakened an important structural area. Structural corrosion can affect the strength, dimensions, alignment, and reliability of a tool. Using a heavily corroded tool for demanding work can create a serious failure risk, particularly when the tool is designed to handle high loads, impacts, or significant clamping forces.
Learning how to distinguish surface rust from structural corrosion is therefore an important part of tool maintenance. The goal is not simply to make a rusty tool look clean. A proper inspection should determine whether the original metal remains sufficiently intact for the tool’s intended purpose.
Why the Difference Between Surface Rust and Structural Corrosion Matters
Rust begins when iron or steel reacts with oxygen and moisture. The resulting corrosion products can initially appear as a thin orange, brown, or reddish layer on the surface.
At this stage, the corrosion may be largely cosmetic. The original shape, thickness, and working surfaces of the tool remain intact, and cleaning can often restore much of its original condition.
Over time, however, corrosion can penetrate deeper into the metal. It may create pits, remove material, weaken edges, damage threads, or reduce the thickness of load-bearing sections.
The important question is not simply, “How rusty does the tool look?” A better question is:
Has corrosion changed the metal in a way that could affect how the tool performs or handles load?
This distinction is especially important for tools such as wrenches, sockets, ratchets, clamps, chisels, hammers, punches, pry bars, and other equipment that may experience substantial mechanical stress.
Start With a Thorough Cleaning
It is difficult to judge corrosion accurately when a tool is covered with oil, grease, dirt, sawdust, paint residue, or loose rust.
Before deciding whether a tool is safe to restore, clean it enough to expose the underlying metal.
Begin by removing loose dirt with a brush or cloth. If grease is present, use a suitable cleaner that is compatible with the tool’s materials. Avoid aggressive chemicals simply because the tool is rusty.
After cleaning, allow the tool to dry completely.
This step is important because accumulated dirt can hide cracks, pits, damaged edges, and areas where corrosion has progressed farther than it initially appears.
Do not immediately assume that a heavily stained tool has deep corrosion. Likewise, do not assume that a tool with only a small visible rust patch is structurally sound. Cleaning and inspection should come before that judgment.
What Surface Rust Usually Looks Like
Surface rust commonly appears as discoloration or a relatively thin layer on top of otherwise solid metal.
Typical signs include:
- Orange or reddish-brown discoloration
- A rough but relatively shallow surface
- Light rust that can be removed with appropriate brushing or abrasion
- No significant change in the original shape
- No deep holes or pronounced depressions
- Sharp edges that remain reasonably well defined
- Threads that still have their original form
- Working surfaces that remain flat or correctly shaped
A rusty tool can look considerably worse than it actually is because rust often spreads across a large visible area without penetrating deeply.
For example, a wrench stored in a damp shed might develop an orange coating across much of its surface. After careful cleaning, the metal underneath may still be solid and retain its original dimensions.
That is very different from a wrench whose jaws have developed deep pits or whose cross-section has been significantly reduced by corrosion.
Signs That Corrosion Has Become More Serious
Structural corrosion usually involves more than simple discoloration.
Look for changes in the physical shape of the metal, particularly in areas that carry loads.
Important warning signs include:
- Deep pits
- Flaking metal
- Significant material loss
- Deep grooves caused by corrosion
- Severely weakened edges
- Distorted working surfaces
- Damaged threads
- Corrosion around cracks or holes
- Thin sections in areas that should be substantial
- Severe corrosion around joints
- Visible cracking
- Loose components caused by corrosion
- Deformation in previously straight or flat areas
The deeper the corrosion penetrates, the more important the tool’s original design becomes.
A small amount of metal loss on a noncritical outer surface may have little practical effect. The same amount of material loss from a narrow load-bearing section can be much more significant.
Look for Pitting Instead of Just Color
One of the most useful ways to judge corrosion is to examine the surface after removing loose rust.
Pitting occurs when corrosion creates small depressions in the metal. Individual pits can range from barely noticeable to relatively deep cavities.
A surface covered with shallow marks may still be serviceable, depending on the tool and its intended use. Deep pitting is more concerning because it represents actual material loss.
Pay particular attention when pits are concentrated in one area rather than evenly distributed.
For example, a broad flat section with several shallow spots may be less concerning than a narrow neck of metal containing deep corrosion pits.
Do not try to determine safety based solely on the number of pits. Their location, depth, size, and relationship to the tool’s load-bearing geometry are also important.
Check the Original Shape of the Tool
Tools are designed with specific shapes and dimensions for a reason.
After cleaning, compare the corroded area with an unaffected portion of the same tool.
Look for changes in:
- Thickness
- Width
- Edge shape
- Flatness
- Alignment
- Roundness
- Thread profile
- Jaw shape
- Contact surfaces
If one section looks significantly thinner or more damaged than another equivalent section, corrosion may have removed meaningful amounts of metal.
If you have access to an identical undamaged tool, comparing the two can also be useful. The comparison does not need to produce an exact engineering measurement. It can simply help identify obvious changes in geometry.
For precision tools or heavily loaded equipment, however, visual comparison alone may not be sufficient.
Pay Special Attention to Stress Concentration Areas
Not every part of a tool experiences stress in the same way.
Some locations naturally experience greater mechanical loads. These areas deserve closer inspection because corrosion in a highly stressed region can be more significant than corrosion on a relatively unimportant surface.
Examples include:
- Corners
- Narrow sections
- Holes
- Threads
- Joints
- Pivot points
- Jaw roots
- Handle connections
- Drive ends
- Areas around pins
- Transition points between thick and thin sections
A small crack or deep corrosion pit near a stress concentration can be much more concerning than a larger patch of superficial rust on a broad, low-stress surface.
This is one reason why simply judging the percentage of the tool covered by rust is not a reliable method of determining its condition.
Inspect Wrenches Carefully
Wrenches deserve particular attention because their working surfaces must maintain their intended geometry.
Inspect the jaws for:
- Deep pitting
- Rounded edges
- Distortion
- Cracks
- Significant corrosion near the jaw roots
- Changes in the opening shape
A thin layer of surface rust on the outside of a wrench may be primarily cosmetic.
However, deep corrosion around the jaws or in the narrower section behind them can be more serious because these areas experience significant forces when the wrench is used.
Do not attempt to determine whether a questionable wrench is safe by deliberately applying excessive force to it. A tool should not be “tested” under dangerous load simply to see whether it breaks.
Inspect Sockets and Ratchets
Sockets can develop corrosion both internally and externally.
Inspect the socket walls, drive end, and working surfaces. Deep pitting inside the socket can affect how the socket contacts a fastener.
The square drive opening also deserves attention. Corrosion that significantly changes its shape or damages the surrounding metal can affect how the socket connects to a ratchet or extension.
Ratchets require additional attention around:
- The square drive
- Head
- Pivoting components
- Mechanism housing
- Retaining components
- Areas with deep corrosion
A rusty ratchet mechanism may sometimes be cleaned and lubricated, but severe corrosion affecting the housing or drive area can be a reason to remove the tool from demanding service.
Examine Clamps and Their Load-Bearing Sections
Clamps can develop serious corrosion because they are often stored in workshops where moisture, wood dust, adhesives, and chemicals are present.
Inspect the frame, threaded screw, pivot areas, and contact points.
Surface rust on the frame may be removable. Deep corrosion in a narrow section of the frame is more concerning because clamps can generate substantial pressure.
Pay attention to the area where the screw connects to the frame. Severe corrosion around this connection can affect the clamp’s reliability.
Do not assume that a clamp is safe simply because it still opens and closes.
Mechanical movement does not necessarily mean that the structural metal remains in good condition.
Inspect Chisels, Punches, and Striking Tools
Tools designed to be struck deserve especially careful inspection.
Chisels, punches, and similar tools can experience repeated impact forces. Corrosion around the working end, shaft, or other stressed areas may therefore be more important than superficial rust on the handle or body.
Look for:
- Deep pits
- Cracks
- Mushroomed striking ends
- Severely damaged edges
- Significant material loss
- Unusual deformation
A tool that has both severe corrosion and impact damage should be treated particularly cautiously.
If structural integrity is questionable, do not continue using it simply because it appears to work.
Threads Can Hide Significant Corrosion
Threads deserve special attention because corrosion can affect both their shape and strength.
Inspect threaded components after cleaning. Look for missing material, deep pitting, flattened thread peaks, irregular shapes, or sections where corrosion has significantly reduced the original profile.
This applies to:
- Clamp screws
- Tool adjusters
- Bolts
- Threaded handles
- Vise components
- Threaded accessories
Light surface oxidation can often be cleaned and protected.
Severe corrosion that has changed the shape of the thread is a different situation. The component may no longer provide the mechanical engagement it was designed to provide.
Check Handle Connections
A tool may have a solid metal working portion but still have a serious problem at the handle connection.
Inspect the area where the handle joins the metal head or shaft.
Look for:
- Corrosion around the connection
- Movement
- Cracks
- Gaps
- Loose fittings
- Missing retaining components
- Severe material loss
This is particularly important for hammers, axes, striking tools, and other equipment where the connection between the head and handle must withstand repeated force.
Never assume that a tight-looking handle is safe if the underlying metal has significant corrosion.
Hidden and Internal Corrosion
Some corrosion cannot be seen immediately.
Examples include corrosion inside:
- Hollow metal sections
- Enclosed mechanisms
- Tubular handles
- Tool heads
- Internal cavities
- Moving assemblies
If moisture has entered an enclosed area, corrosion can sometimes progress unnoticed.
Unusual looseness, grinding, stiffness, abnormal movement, or unexplained mechanical changes may justify a more detailed inspection.
Do not unnecessarily disassemble complex tools if you do not have the knowledge or manufacturer’s instructions required to reassemble them correctly.
For mechanisms such as ratchets or specialized power tools, professional service may be more appropriate when internal corrosion is suspected.
When Surface Rust Is Usually Restorable
Surface rust is generally a good candidate for restoration when the underlying metal remains intact.
A tool is more likely to be suitable for restoration when:
- Rust is mostly superficial
- The original shape remains intact
- There is little or no pitting
- Threads retain their original profile
- Working surfaces remain properly shaped
- No cracks are visible
- No important load-bearing section appears weakened
- Moving parts remain structurally sound
In these cases, cleaning, rust removal, drying, and corrosion protection may return the tool to useful condition.
The restoration process should still be appropriate for the tool. Aggressive grinding can remove metal unnecessarily, turning a manageable rust problem into a dimensional problem.
When Corrosion Should Make You Remove a Tool From Service
A tool should be treated as unsuitable for demanding work when corrosion has created a reasonable concern about its structural integrity.
Warning conditions include:
- Deep material loss in a load-bearing area
- Large or deep pits
- Cracks associated with corrosion
- Severely damaged threads
- Significant reduction in thickness
- Distorted working surfaces
- Corrosion around critical joints
- Severe damage to a drive connection
- Structural deformation
- Uncertainty about whether the remaining metal can safely handle the intended load
The more force a tool is designed to handle, the more conservative the decision should be.
A heavily corroded decorative tool and a heavily corroded breaker bar should not be evaluated in exactly the same way.
Remember That Oil Does Not Repair Lost Metal
One common mistake is assuming that applying oil makes a severely corroded tool safe again.
Oil can help prevent additional corrosion, but it cannot replace metal that has already been lost.
The same principle applies to paint, wax, protective coatings, and other corrosion-control products.
These products can protect sound metal. They cannot restore the original mechanical strength of a section that has been deeply eaten away by corrosion.
For that reason, a tool should be evaluated before applying a permanent coating.
Avoid Covering Serious Corrosion With Paint
Painting over corrosion can make a tool look much better without actually solving the underlying problem.
If corrosion is active or severe, the metal should be inspected and appropriately prepared before applying any coating.
Otherwise, a damaged area can become harder to see during future inspections.
For structural tools, appearance should never be prioritized over inspection.
A clean-looking tool is not necessarily a sound tool.
Do Not Use Load Testing as a Safety Test
Never intentionally overload a questionable tool to find out whether it can still handle the force.
For example, do not take a severely corroded wrench and apply excessive force simply to see whether it bends or breaks.
A tool failure can occur suddenly and can result in injury or damage.
When structural integrity is questionable, the safer approach is to stop using the tool for high-load applications and either replace it or have it assessed by someone qualified to evaluate the specific equipment.
Compare With an Undamaged Example When Possible
If the same tool is available in good condition, comparison can be extremely useful.
Place the two tools side by side and compare their:
- Thickness
- Shape
- Edges
- Threads
- Openings
- Working surfaces
- Joints
- Connection points
This can make material loss easier to identify.
However, do not assume that visual similarity proves safety. Some internal defects cannot be identified through casual comparison.
For critical equipment, manufacturer’s specifications or professional inspection may be necessary.
Common Mistakes When Evaluating Rust Damage
Several mistakes can make corrosion assessment unreliable.
Judging by Color Alone
Orange rust does not automatically mean severe corrosion. Dark discoloration does not automatically mean the tool is structurally sound.
Removing Too Much Metal During Cleaning
Aggressive grinding or sanding can change the original dimensions of the tool.
Ignoring Pitting
A tool can look clean after loose rust is removed while still having significant material loss underneath.
Inspecting Only the Outside
Threads, joints, drive openings, and hidden areas can be more important than large visible surfaces.
Focusing on Appearance
A polished tool is not necessarily a safe tool.
Testing a Questionable Tool Under Load
Never deliberately overload a tool to determine whether it will fail.
Assuming Lubrication Solves Corrosion
Lubricant can protect metal but cannot replace material that corrosion has already removed.
A Practical Rust and Corrosion Inspection Checklist
Before returning a rusty metal tool to service, inspect it systematically.
First, clean the tool:
- Remove dirt and grease
- Remove loose rust
- Dry the tool completely
Then inspect the metal:
- Look for pits
- Check for cracks
- Examine edges
- Compare thickness
- Look for material loss
- Check for deformation
Inspect working areas:
- Wrench jaws
- Socket openings
- Ratchet drive
- Clamp frames
- Threads
- Chisel edges
- Striking surfaces
- Pivot points
Inspect connections:
- Handles
- Pins
- Joints
- Screws
- Retaining components
Finally, consider the intended use:
- Is the tool used under high load?
- Does it experience impact?
- Is dimensional accuracy important?
- Has corrosion affected a critical section?
- Is there any uncertainty about structural integrity?
If the answer to the last question is yes, the safest decision may be to retire the tool rather than attempting to restore it.
A Simple Way to Think About Rust Severity
A useful maintenance approach is to divide corrosion into three broad levels.
Level one: surface corrosion. The metal is discolored or lightly rough, but its original shape and strength appear intact.
Level two: moderate corrosion with pitting. The tool has visible material loss, but the extent and location require careful evaluation before continued use.
Level three: structural corrosion. Important load-bearing areas have deep material loss, severe pitting, cracks, distortion, damaged threads, or other signs that the original mechanical integrity may have been compromised.
This is not an engineering certification system. It is simply a practical way to organize an inspection and make better maintenance decisions.
Final Thoughts
Rust does not automatically mean that a metal tool needs to be thrown away. Many tools develop surface corrosion during normal storage and can be cleaned, protected, and returned to service.
The important distinction is whether the corrosion has affected the underlying metal.
Surface rust is primarily a maintenance problem. Structural corrosion is a potential safety and reliability problem.
After cleaning a rusty tool, look beyond its color. Examine its shape, thickness, working surfaces, threads, joints, connections, and load-bearing areas. Pay particular attention to deep pitting and material loss in locations that experience significant force.
If the original geometry remains intact and there are no signs of structural damage, restoration may be appropriate. If corrosion has significantly weakened an important section, do not rely on oil, paint, or appearance to compensate for the lost material.
A good maintenance routine is not about keeping every old tool in service at any cost. It is about knowing which tools can be safely restored, which require professional assessment, and which should be replaced. That judgment helps protect both the tool investment and the person using it.
